This is default featured slide 1 title

Go to Blogger edit html and find these sentences.Now replace these sentences with your own descriptions.

This is default featured slide 2 title

Go to Blogger edit html and find these sentences.Now replace these sentences with your own descriptions.

This is default featured slide 3 title

Go to Blogger edit html and find these sentences.Now replace these sentences with your own descriptions.

This is default featured slide 4 title

Go to Blogger edit html and find these sentences.Now replace these sentences with your own descriptions.

This is default featured slide 5 title

Go to Blogger edit html and find these sentences.Now replace these sentences with your own descriptions.

*/
레이블이 error인 게시물을 표시합니다. 모든 게시물 표시

MySQL DB 옮기기

환경

 원본 DB시스템 : Windows 11, MySQL 8.0

 타겟 DB시스템 : CentOS Linux 7, MariaDB 5.5


MySQL dump 사용법

Backup

> mysqldump.exe -u[유저명] -p[패스워드] database명 [table명] > 파일명.sql 이나
> mysqldump.exe -u[유저명] -p[패스워드] database명 [table명] -r 파일명.sql

Restore

     > mysql 실행
     mysql> use DB명
     mysql> source 디렉토리명/파일명.sql


예) Windows 에 있는 MySQL의 database명 fd, table명 breeds 을 a.sql로 백업

d:\work> & 'C:\Program Files\MySQL\MySQL Server 8.0\bin\mysqldump' -uroot -p fd breeds  > a.sql 


예) 윈도우즈의 database fd에 있는 table 전체를 백업 할 때

d:\work> & 'C:\Program Files\MySQL\MySQL Server 8.0\bin\mysqldump' -uroot -p fd -r fd.sql


윈도우즈에서 백업한것을 다시 DB에 올리는 경우

c:\> &'C:\Program Files\MySQL\MySQL Server 8.0\bin\mysql' -uroot -p fd 

mysql> source d:/work/fd.sql 

[Error] Invariant Violation: requireNativeComponent: "RNSScreenStackHeaderConfig" was not found in the UIManager.

 React-native 로 페이지 이동하는 것을 연습하는데 계속해서 위 제목과 같은 오류가 발생한다.


Navigating Between Screens 페이지에서 아래와 같이 설치하라고 한 것을 안했다는 이유로 종속성에 문제가 생긴 것이다. react-vativr-screens와 react-native-area-context를 install 하고 나니 정상적으로 실행된다.

> npm install react-native-screens react-native-safe-area-context

노트에는 Warning이 나올 수도 있다는 건데... Error 라니...


관련글


React-native App 생성 오류

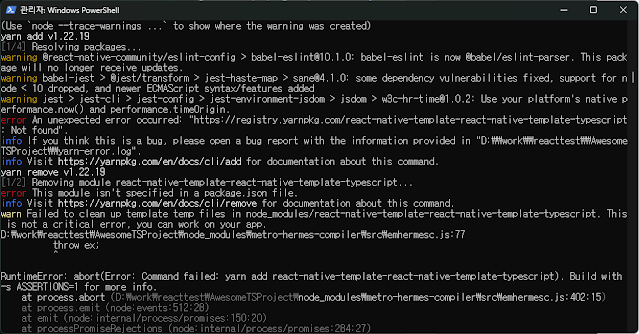
react-native 로 App을 개발할 때 아래와 같은 명령으로 Typescript 템플릿으로 App을 생성시
$> npx react-native init AwesomeTSProject --template react-native-template-typescript

아래와 같은 오류가 발생
error An unexpected error occurred: "https://registry.yarnpkg.com/react-native-template-react-native-template-typescript: Not found".
info If you think this is a bug, please open a bug report with the information provided in "D:\\work\\reacttest\\AwesomeTSProject\\yarn-error.log".
info Visit https://yarnpkg.com/en/docs/cli/add for documentation about this command.
yarn remove v1.22.19
[1/2] Removing module react-native-template-react-native-template-typescript...
error This module isn't specified in a package.json file.
info Visit https://yarnpkg.com/en/docs/cli/remove for documentation about this command.
warn Failed to clean up template temp files in node_modules/react-native-template-react-native-template-typescript. This is not a critical error, you can work on your app.
D:\work\reacttest\AwesomeTSProject\node_modules\metro-hermes-compiler\src\emhermesc.js:77
          throw ex;
          ^

RuntimeError: abort(Error: Command failed: yarn add react-native-template-react-native-template-typescript). Build with -s ASSERTIONS=1 for more info.
    at process.abort (D:\work\reacttest\AwesomeTSProject\node_modules\metro-hermes-compiler\src\emhermesc.js:402:15)

Nodejs, JAVA JDK를 새로 깔아도 오류가 계속 발생.
react-native-cli를 새로 설치하니 문제가 해결되었다.

$> npm uninstall react-native-cli
$> yarn global add @react-native-community/cli
$> npx react-native init AwesomeTSProject --templete react-native-typescript


PC에서 ARM용 크로스 컴파일 후 strip 시 오류 발생

 OpenCV를 ARM용으로 Cross Compile후 strip실행시 아래와 같은 오류 발생

strip -s *.so   
    strip: Unable to recognise the format of the input file 'libopencv_calib3d.so'

원인은 strip을 호스트용을 사용해서 발생한 것으로 ARM용으로 strip을 할수 있는 arm-linux-gnueabi-strip을 사용하면 정상적으로 strip이 되는것을 확인할 수 있다.

arm-linux-gnueabi-strip -s *.so


[OpenCV] OpenCV4에서 UVC Camera 사용시 capture 안되는 이슈

환경 :

- 라즈베리파이 4 with 라즈베리안

- OpenCV 4 


guvcview로는 video가 나오는데 테스트하려는 코드에서는 아래와 같은 오류 발생..


[ WARN:0] global /home/pi/work/opencv/opencv-4.1.2/modules/videoio/src/cap_gstreamer.cpp (933) open OpenCV | GStreamer warning: Cannot query video position: status=0, value=-1, duration=-1

[ WARN:0] global /home/pi/work/opencv/opencv-4.1.2/modules/videoio/src/cap_gstreamer.cpp (1184) setProperty OpenCV | GStreamer warning: GStreamer: unhandled property


vSomeIP version 2.14.16 빌드

CommonAPI C++ with SOME/IP Example 에서

$git clone http://github.com/GENIVI/vSomeIP.git 하면 현재(2020년2월27일) 설치되는 버젼이 vsomeip 3.1.7.1의 코드가 설치되는데 본 코드로 빌드하면 capicxx-someip-runtime 빌드시 vsomeip를 찾을수 없다는 오류가 발생한다.

vSomeIP 디렉토리에서 아래 명령어로 로그와 현재 버전을 체크한다.
$git log

$ git show

vsomip 2.14.16버전으로 돌리고자하면 로그상에서 몇번째 아래에 있는지 확인하고(여기서는 1단계 아래) 아래와 같이 git checkout HEAD~1을 해준다. 5단계 아래일 경우 git checkout HEAD~5. 가장 최신으로 돌아올 경우 git checkout master

$git checkout HEAD~1


이제 다시 예제로 돌아가서 libvsomeipxxx.so들을 생성하고 commonapi 라이브러리들을 build하자.


관련링크 :
CommonAPI Stub? Proxy?
SOME/IP 헤더 구조와 fdepl파일 관계
CommonAPI Generator로 생성되는 file
CommonAPI C++ with SOME/IP Example
Franca 설치 가이드
Linux Xubuntu에 CommonAPI C/C++ 개발환경 구축하기


files list file for package 'libgcc-5-dev:amd64' is missing final newline 오류

환경 :
 - VMware
 - Ubuntu 16.04 x64

시스템에 git을 설치하려 sudo apt-get install git 을 했는데 다음과 같은 오류 발생
sudo apt-get install git

여러가지  검색결과 여기서 해결방법을 찾았다.
우선/var/lib/dpkg/info/에 있는 아래 파일들을 제거한다.
$ ls /var/lib/dpkg/info/libgcc-5*
/var/lib/dpkg/info/libgcc-5-dev:amd64.list
/var/lib/dpkg/info/libgcc-5-dev:amd64.md5sums

$ sudo rm /var/lib/dpkg/info/libgcc-5*

2개파일을 지우고 다음 세개의 명령어를 실행한다.
sudo dpkg --configure -a
sudo apt update
sudo apt upgrade
그리고, 처음에 오류났던 git설치 작업을 계속한다.


ImportError: DLL load failed: 지정된 모듈을 찾을 수 없습니다. 오류

오류 발생 환경
 - Windows 10, x64
 - python 3.6.8
 - OpenCV
tensorflow 설치후 DLL을 찾을수 없다는 오류가 발생

C:\Users\user>python

Python 3.6.8 (tags/v3.6.8:3c6b436a57, Dec 24 2018, 00:16:47) [MSC v.1916 64 bit (AMD64)] on win32

Type "help", "copyright", "credits" or "license" for more information.

<> import tensorflow as tf
Traceback (most recent call last):
File "C:\Users\user\AppData\Local\Programs\Python\Python36\lib\site-packages\tensorflow\python\pywrap_tensorflow.py", line 58, in
from tensorflow.python.pywrap_tensorflow_internal import *
File "C:\Users\user\AppData\Local\Programs\Python\Python36\lib\site-packages\tensorflow\python\pywrap_tensorflow_internal.py", line 28, in
_pywrap_tensorflow_internal = swig_import_helper()
File "C:\Users\user\AppData\Local\Programs\Python\Python36\lib\site-packages\tensorflow\python\pywrap_tensorflow_internal.py", line 24, in swig_import_helper
_mod = imp.load_module('_pywrap_tensorflow_internal', fp, pathname, description)
File "C:\Users\user\AppData\Local\Programs\Python\Python36\lib\imp.py", line 243, in load_module
return load_dynamic(name, filename, file)
File "C:\Users\user\AppData\Local\Programs\Python\Python36\lib\imp.py", line 343, in load_dynamic
return _load(spec)
ImportError: DLL load failed: The specified module could not be found.
MS에서 제공하는 msvcp140.dll과 충돌이 일어나서 발생하는 경우가 있다고 한다.
Visual Studio 2015, 2017 및 2019용 Microsoft Visual C++ 재배포 가능 패키지( x64, vc_redist.x64.exe)를 재설치 하면 해결된다.